Mixed Martial Analytics
Data was scraped by an unknown 3rd party from the Sherdog Website. It can be found here.
There were a total of 3,569 fights and 1,561 fighters in the two main data sets. The fights ranged from November 12, 1993 all the way up until February 21st, 2016.
All R code for this and other projects can be found on my GitHub site.
Striking versus Grappling: How do fighters win in MMA?
Most fights are won with striking, followed by chokes and joint locks. The graph below also indicates that the majority of fights were won in the first round.
There were a total of 3,569 fights in this data set. No Contest results are not included. A more detailed analysis of the different types of strikes, chokes, joint locks that won fights can be found in the supplementary section. Subcategories of winning methods were cleaned up manually. An analysis of Wins by Decision are also located in the supplementary section.
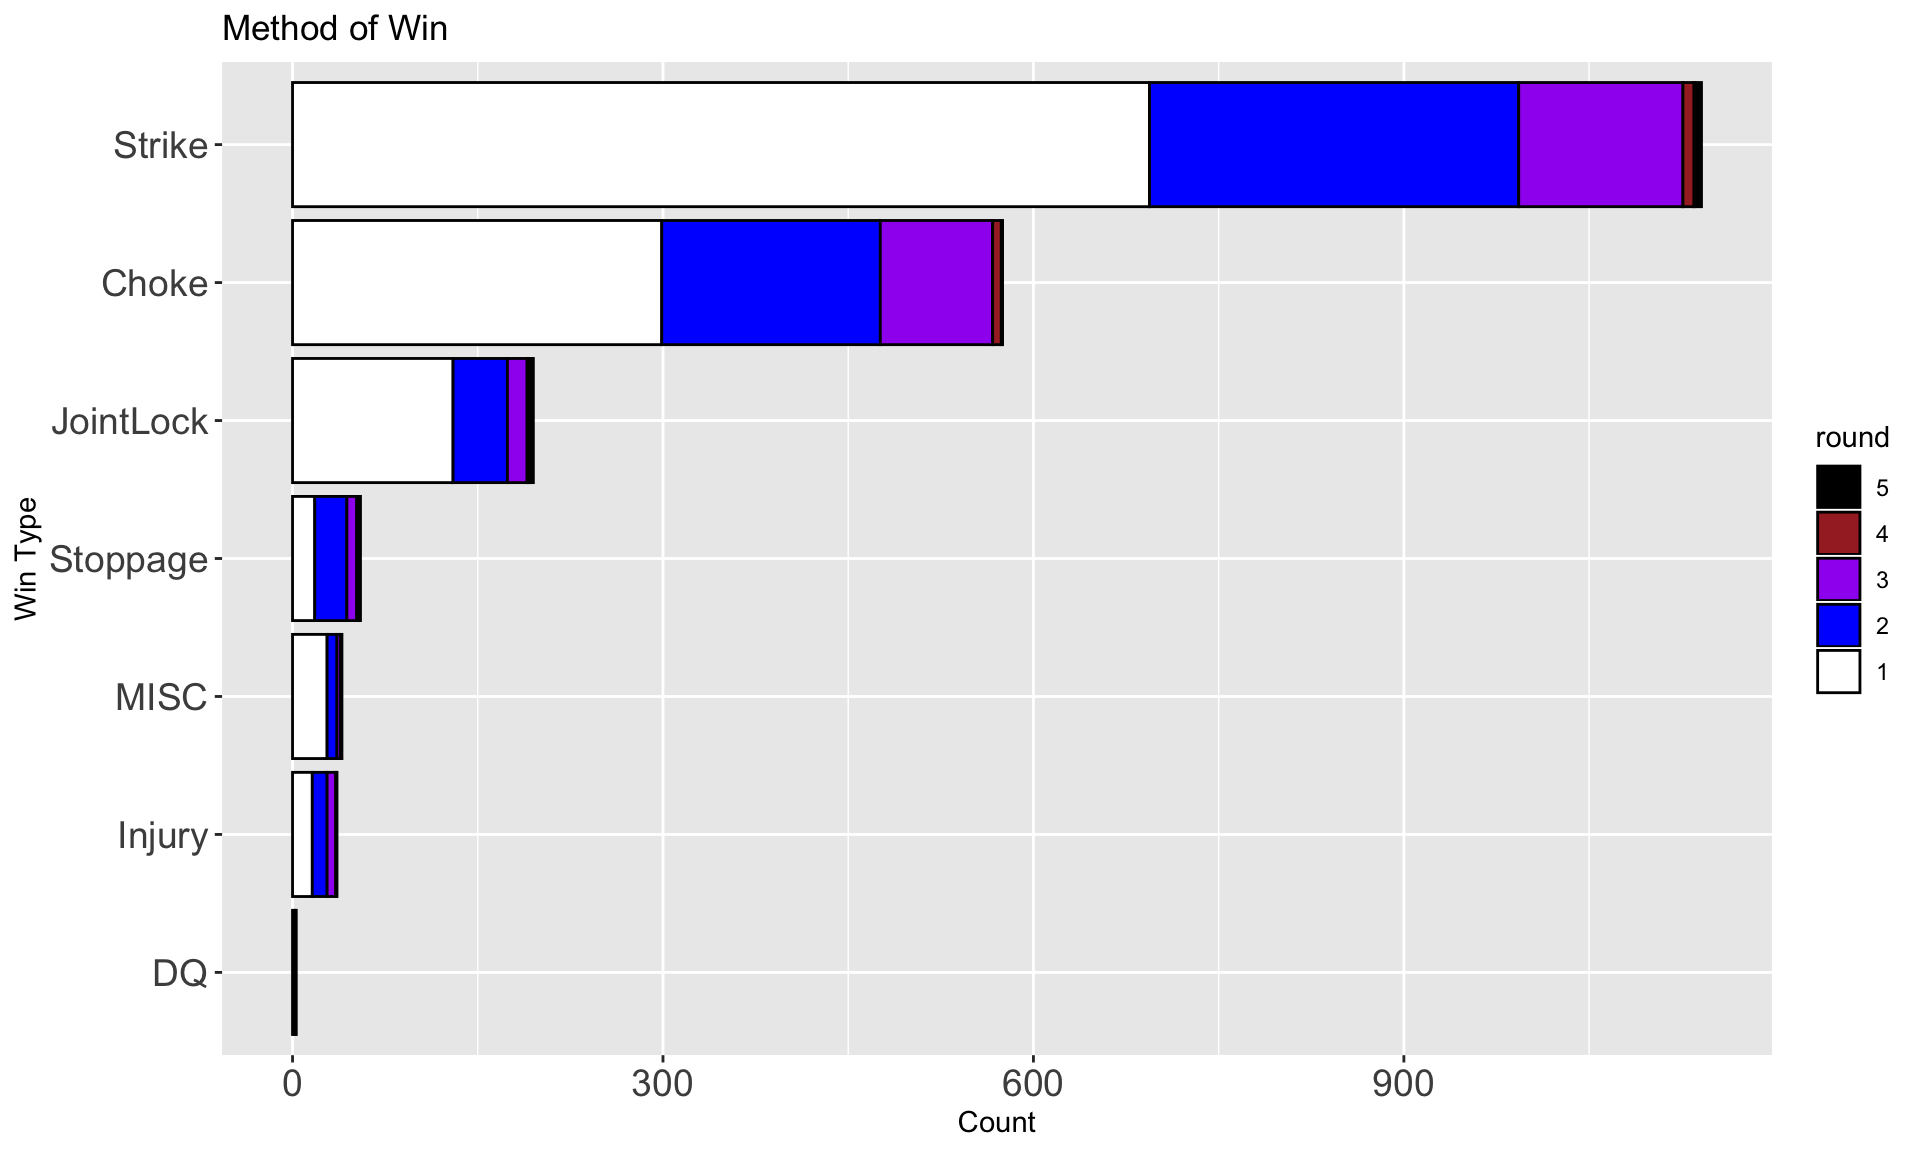
| Category | Round 1 | Round 2 | Round 3 | Round 4 | Round 5 | Total |
|---|---|---|---|---|---|---|
| Strike | 694 | 299 | 133 | 9 | 6 | 1141 |
| Choke | 299 | 177 | 91 | 7 | 1 | 575 |
| JointLock | 130 | 44 | 16 | 1 | 4 | 195 |
| Stoppage | 18 | 26 | 8 | 2 | 1 | 55 |
| MISC | 28 | 8 | 3 | 1 | 0 | 40 |
| Injury | 16 | 12 | 7 | 1 | 0 | 36 |
| DQ | 2 | 0 | 1 | 0 | 0 | 3 |
In what round are most fights won?

Ring Rust: Is it real?
The analysis below examined the average days between wins and losses for the fighter’s last fight. Results showed that fighters who won their most recent fight in the data had a longer time since their last fight than losers. This difference was statistically significant (p < .05).
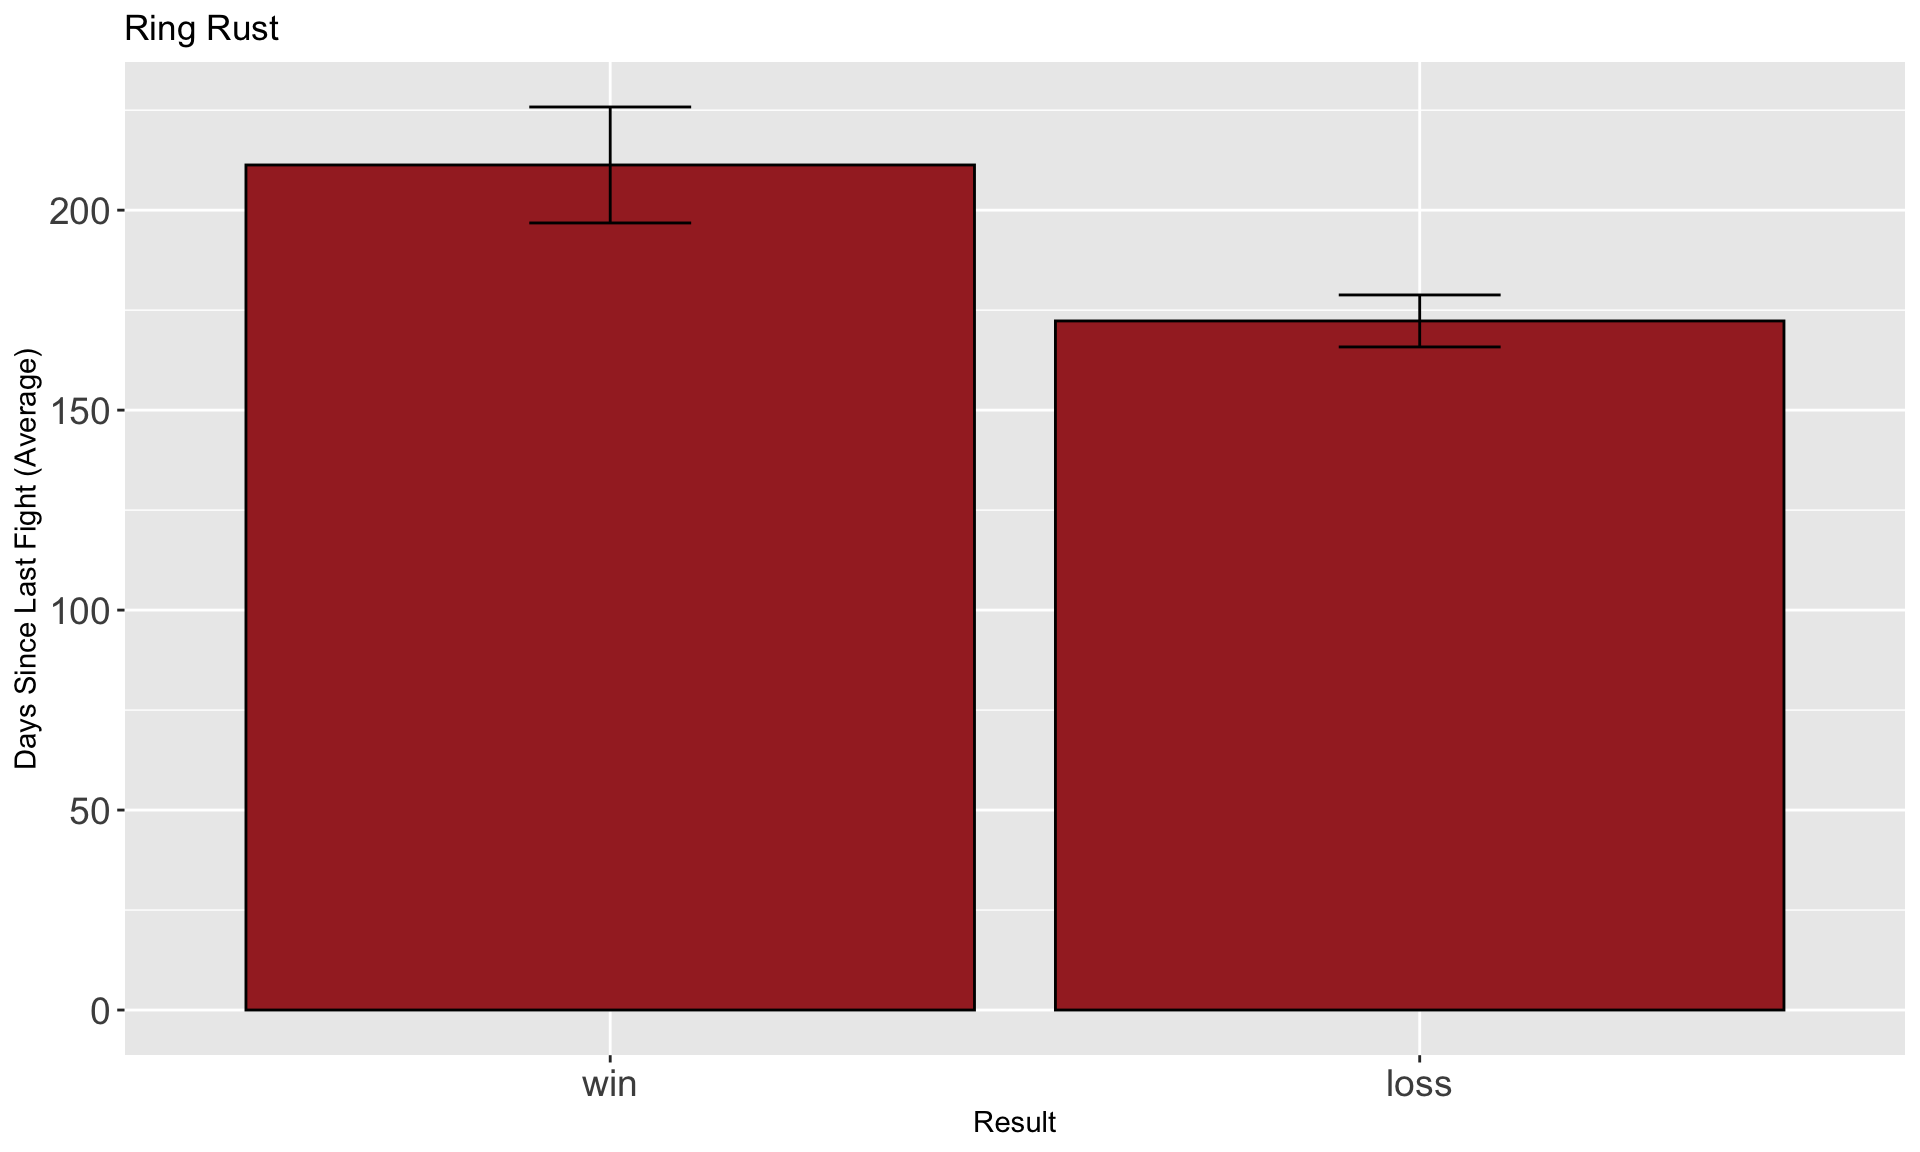
| Result | Difference in Days |
|---|---|
| loss | 172.3 days |
| win | 211.3 days |
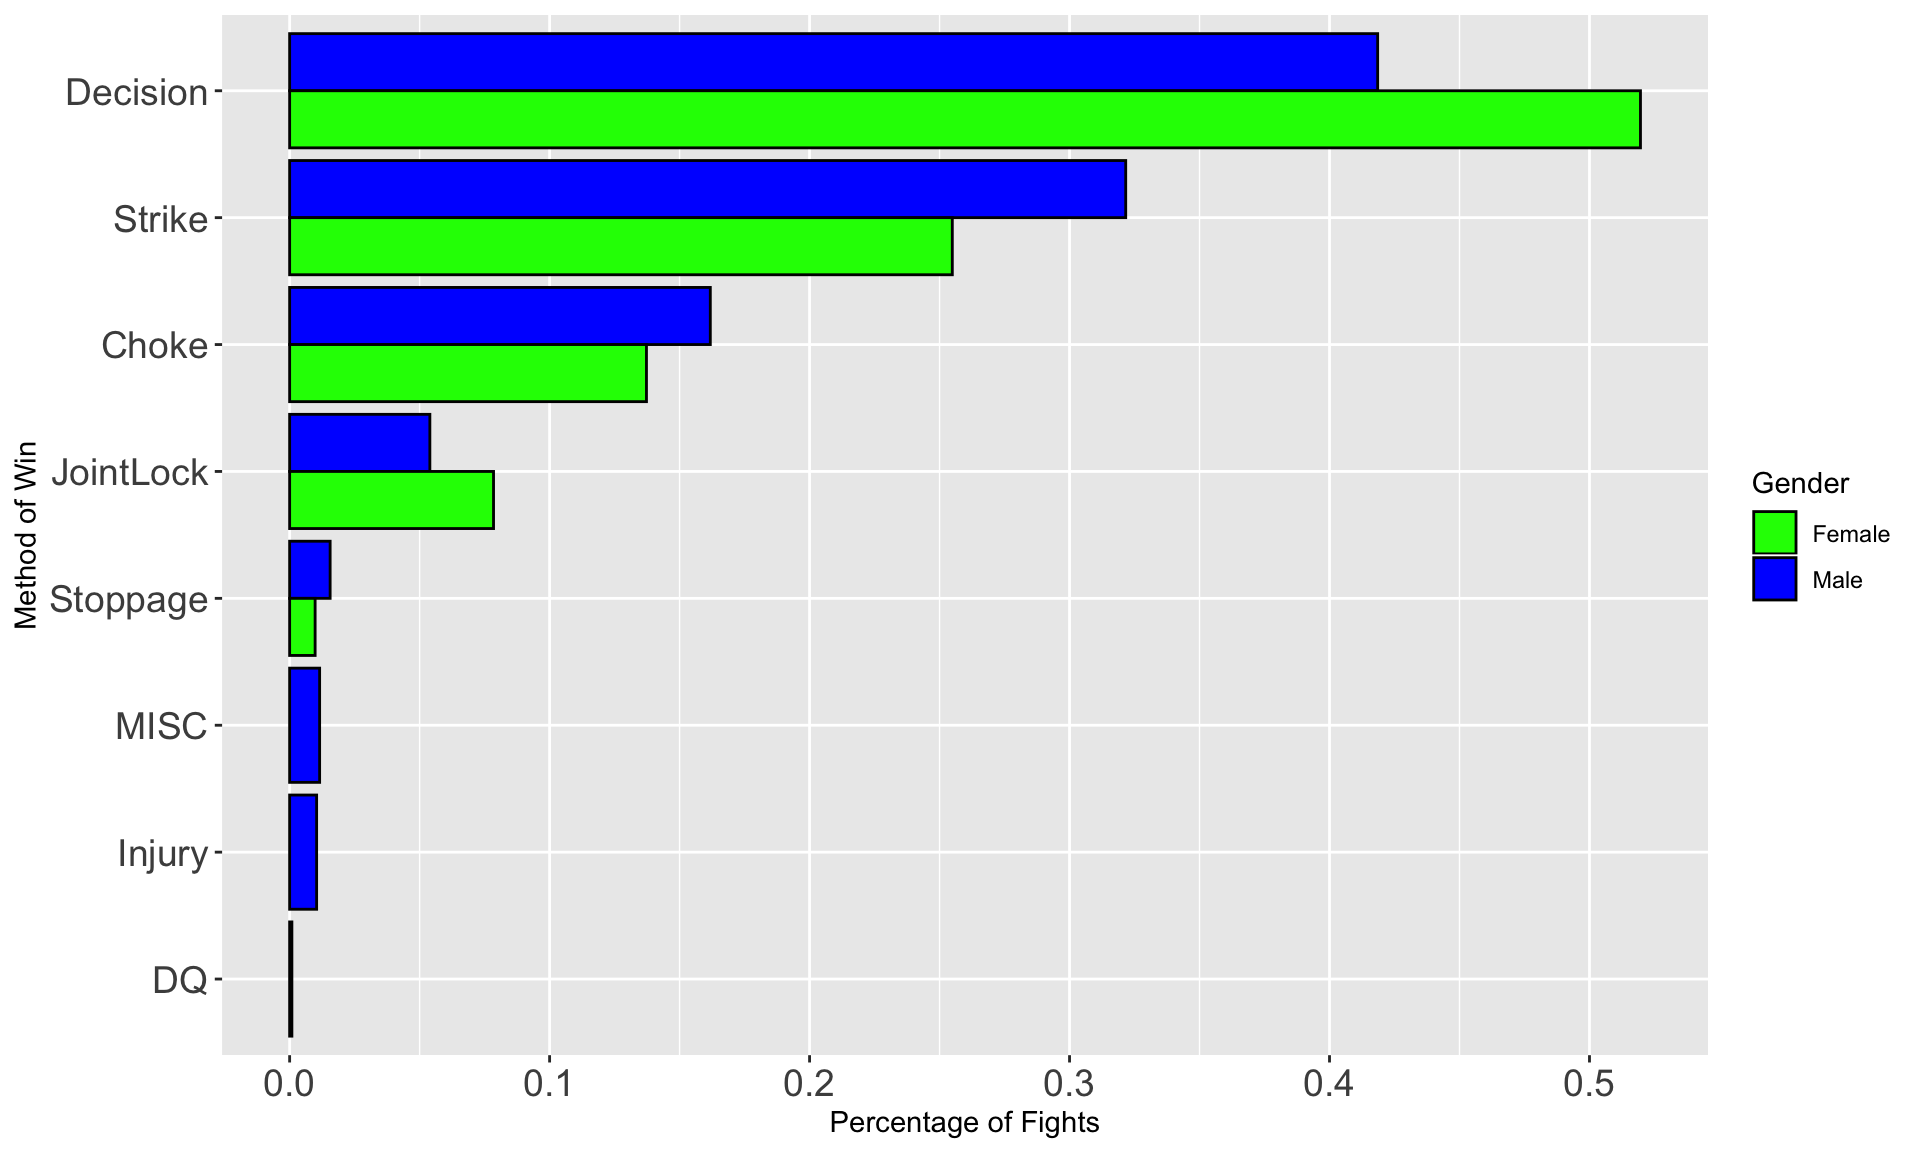
Fight like a girl: Are their gender differences in how MMA fights are won?
For both men and women, more fights ended in decision than any other way. This was followed by striking, then choking then joint locks for both genders.
About 52% of female fights end in decision, while only 42% of male fights end in the same way. Men win more fights with striking (M:32%, F:25%) and choking (M:16%, F:14%) than women. However, women win fights with joint locks more so than men (F: 8%, M: 5%). Overall, women are more likely to last the entirety of the fight than men (F: 52%, M: 48%), but they are also less likely to knock out or choke out their opponents (M: 49%, F: 39%).
There were a total of 3,467 male fights and 102 female fights. The large disparity in the number of male and female fights required an analysis of percentages rather than raw counts. Percentage of total fights were calculated using a simple formula: Winning Method (count)/Fights (count). Gender was not included in the data set, and was added manually by the author.
One piece of feedback regarding this data that I found interesting was that it is possble that physical weight is playing a role in the gender differences as well. The female fighters are lighter than the men, and limiting the male fighter comparison data to the lower male weight classes might offer a better comparison than including all male weight classes.
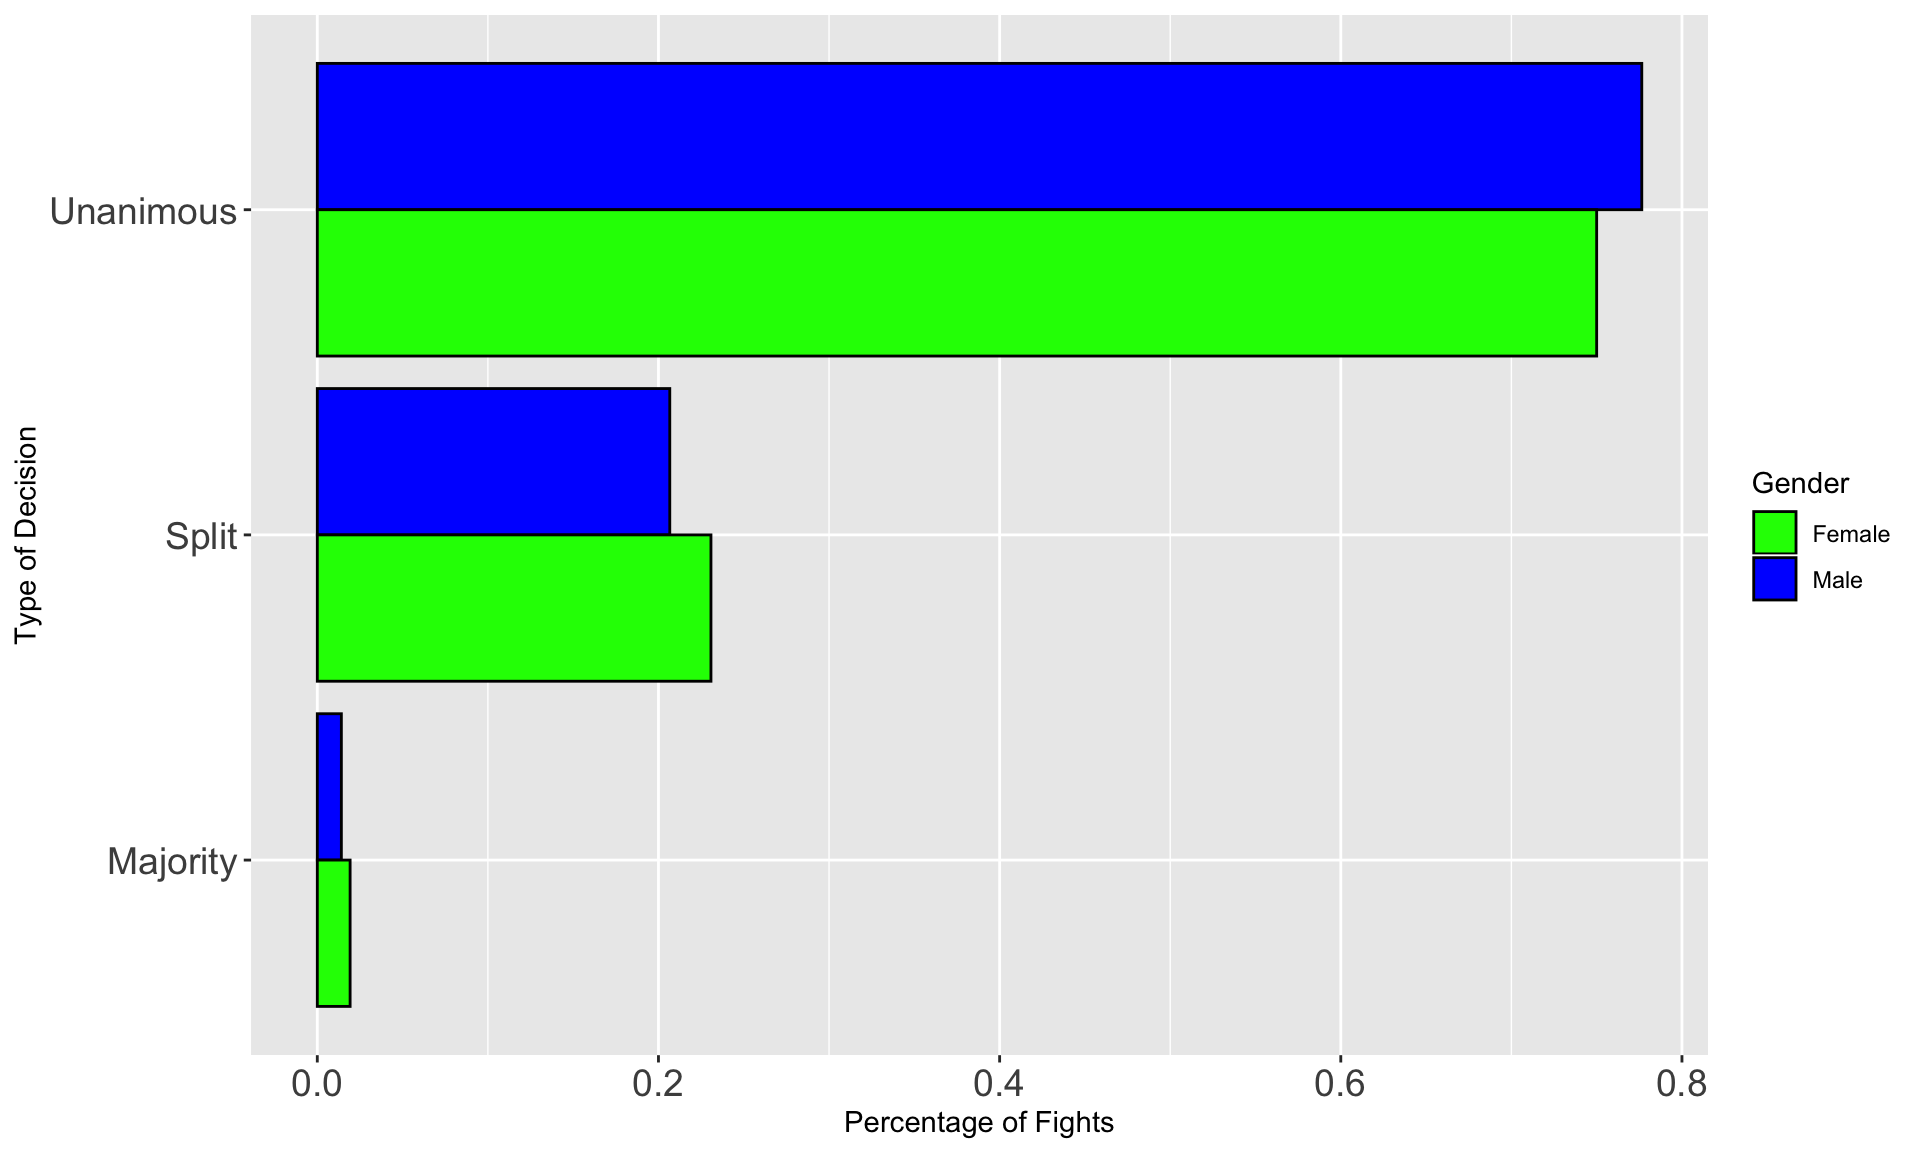
Gender differences in Decision Wins?
Overall, male fights end in unanimous decisions slightly more often than female fights. Female fights also have slightly more split decisions and majority decisions.
Where do MMA fighters come from?
Below is a map of all the UFC fighters contained in the data set. It is interactive.
Where do most winners come from?
Below are tables that include the Countries, Locations and Associations with the most wins.
The country with the most wins was USA.
| Country | Wins | Loss | Draw | Win_Loss_Ratio |
|---|---|---|---|---|
| United States | 2147 | 2176 | 20 | 0.99 |
| Brazil | 531 | 425 | 8 | 1.25 |
| Canada | 183 | 181 | 1 | 1.01 |
| England | 110 | 129 | 2 | 0.85 |
| Japan | 73 | 116 | 4 | 0.63 |
| Russia | 52 | 26 | 1 | 2.00 |
| Australia | 48 | 56 | 0 | 0.86 |
| Netherlands | 28 | 22 | 0 | 1.27 |
| South Korea | 28 | 16 | 0 | 1.75 |
| Sweden | 27 | 31 | 0 | 0.87 |
The country with the best win/loss ratio is Scotland
For this data I only used countries that had at least 10 fights for this calculation.
| Country | Wins | Loss | Draw | Win_Loss_Ratio |
|---|---|---|---|---|
| Scotland | 7 | 3 | 0 | 2.33 |
| Belarus | 21 | 10 | 0 | 2.10 |
| Russia | 52 | 26 | 1 | 2.00 |
| Denmark | 12 | 6 | 1 | 2.00 |
| South Korea | 28 | 16 | 0 | 1.75 |
| Ireland | 21 | 13 | 0 | 1.62 |
| Mexico | 22 | 17 | 0 | 1.29 |
| Netherlands | 28 | 22 | 0 | 1.27 |
| Brazil | 531 | 425 | 8 | 1.25 |
| New Zealand | 10 | 9 | 1 | 1.11 |
The location with the most wins is Rio de Janeiro, Brazil.
| Location | Wins | Loss | Draw | Win_Loss_Ratio |
|---|---|---|---|---|
| Rio de Janeiro, Brazil | 75 | 65 | 3 | 1.15 |
| Albuquerque, New Mexico, United States | 52 | 39 | 0 | 1.33 |
| San Diego, California, United States | 45 | 57 | 1 | 0.79 |
| Las Vegas, Nevada, United States | 41 | 46 | 1 | 0.89 |
| Fortaleza, Ceara, Brazil | 37 | 33 | 0 | 1.12 |
| San Jose, California, United States | 36 | 26 | 0 | 1.38 |
| Phoenix, Arizona, United States | 33 | 34 | 0 | 0.97 |
| Portland, Oregon, United States | 33 | 25 | 0 | 1.32 |
| Curitiba, Parana, Brazil | 30 | 26 | 0 | 1.15 |
| Tempe, Arizona, United States | 29 | 30 | 0 | 0.97 |
The locations with the highest win/loss ratios are Santa Monica and Oxnard Cailfornia.
I only used locations that had at least 10 fights for this calculation.
| Location | Wins | Loss | Draw | Win_Loss_Ratio |
|---|---|---|---|---|
| Santa Monica, California, United States | 10 | 1 | 0 | 10.0 |
| Oxnard, California, United States | 10 | 1 | 0 | 10.0 |
| St. Isidore, Quebec, Canada | 19 | 2 | 0 | 9.5 |
| Sierra Vista, Arizona, United States | 9 | 1 | 0 | 9.0 |
| Baldwin, New York, United States | 9 | 1 | 0 | 9.0 |
| Salinas, California, United States | 11 | 2 | 0 | 5.5 |
| Kirkland, Washington, United States | 11 | 2 | 1 | 5.5 |
| Manaus, Amazonas, Brazil | 18 | 4 | 0 | 4.5 |
| Porto Alegre, Rio Grande do Sul, Brazil | 8 | 2 | 0 | 4.0 |
| Independence, Ohio, United States | 8 | 2 | 0 | 4.0 |
The association with the most wins is the American Top Team.
| Association | Wins | Loss | Draw | Win_Loss_Ratio |
|---|---|---|---|---|
| American Top Team | 215 | 173 | 3 | 1.24 |
| Jackson-Wink MMA | 158 | 124 | 0 | 1.27 |
| Blackzilians | 82 | 56 | 1 | 1.46 |
| American Kickboxing Academy | 76 | 55 | 2 | 1.38 |
| Xtreme Couture | 71 | 53 | 0 | 1.34 |
| Alliance MMA | 70 | 64 | 0 | 1.09 |
| Tristar Gym | 69 | 40 | 0 | 1.73 |
| Nova Uniao | 51 | 32 | 1 | 1.59 |
| MMA Lab | 51 | 44 | 0 | 1.16 |
| Team Nogueira | 48 | 37 | 0 | 1.30 |
The association with the highest win/loss ratio is Team Frye.
I only used associations who had at least 10 fights for this calculation.
| association | Wins | Loss | Draw | Win_Loss_Ratio |
|---|---|---|---|---|
| Team Frye | 9 | 1 | 0 | 9.00 |
| AMC Pankration | 11 | 2 | 1 | 5.50 |
| The Alliance | 8 | 2 | 0 | 4.00 |
| Werdum Combat Team | 8 | 2 | 0 | 4.00 |
| Long Island MMA | 13 | 4 | 0 | 3.25 |
| K Dojo Warrior Tribe | 9 | 3 | 0 | 3.00 |
| Glendale Fighting Club | 9 | 3 | 1 | 3.00 |
| Busan Team M.A.D. | 14 | 5 | 0 | 2.80 |
| Wajutsu Keishukai Tokyo | 13 | 5 | 0 | 2.60 |
| HIT Squad | 23 | 9 | 1 | 2.56 |
Supplementary Data
Wins by Strike
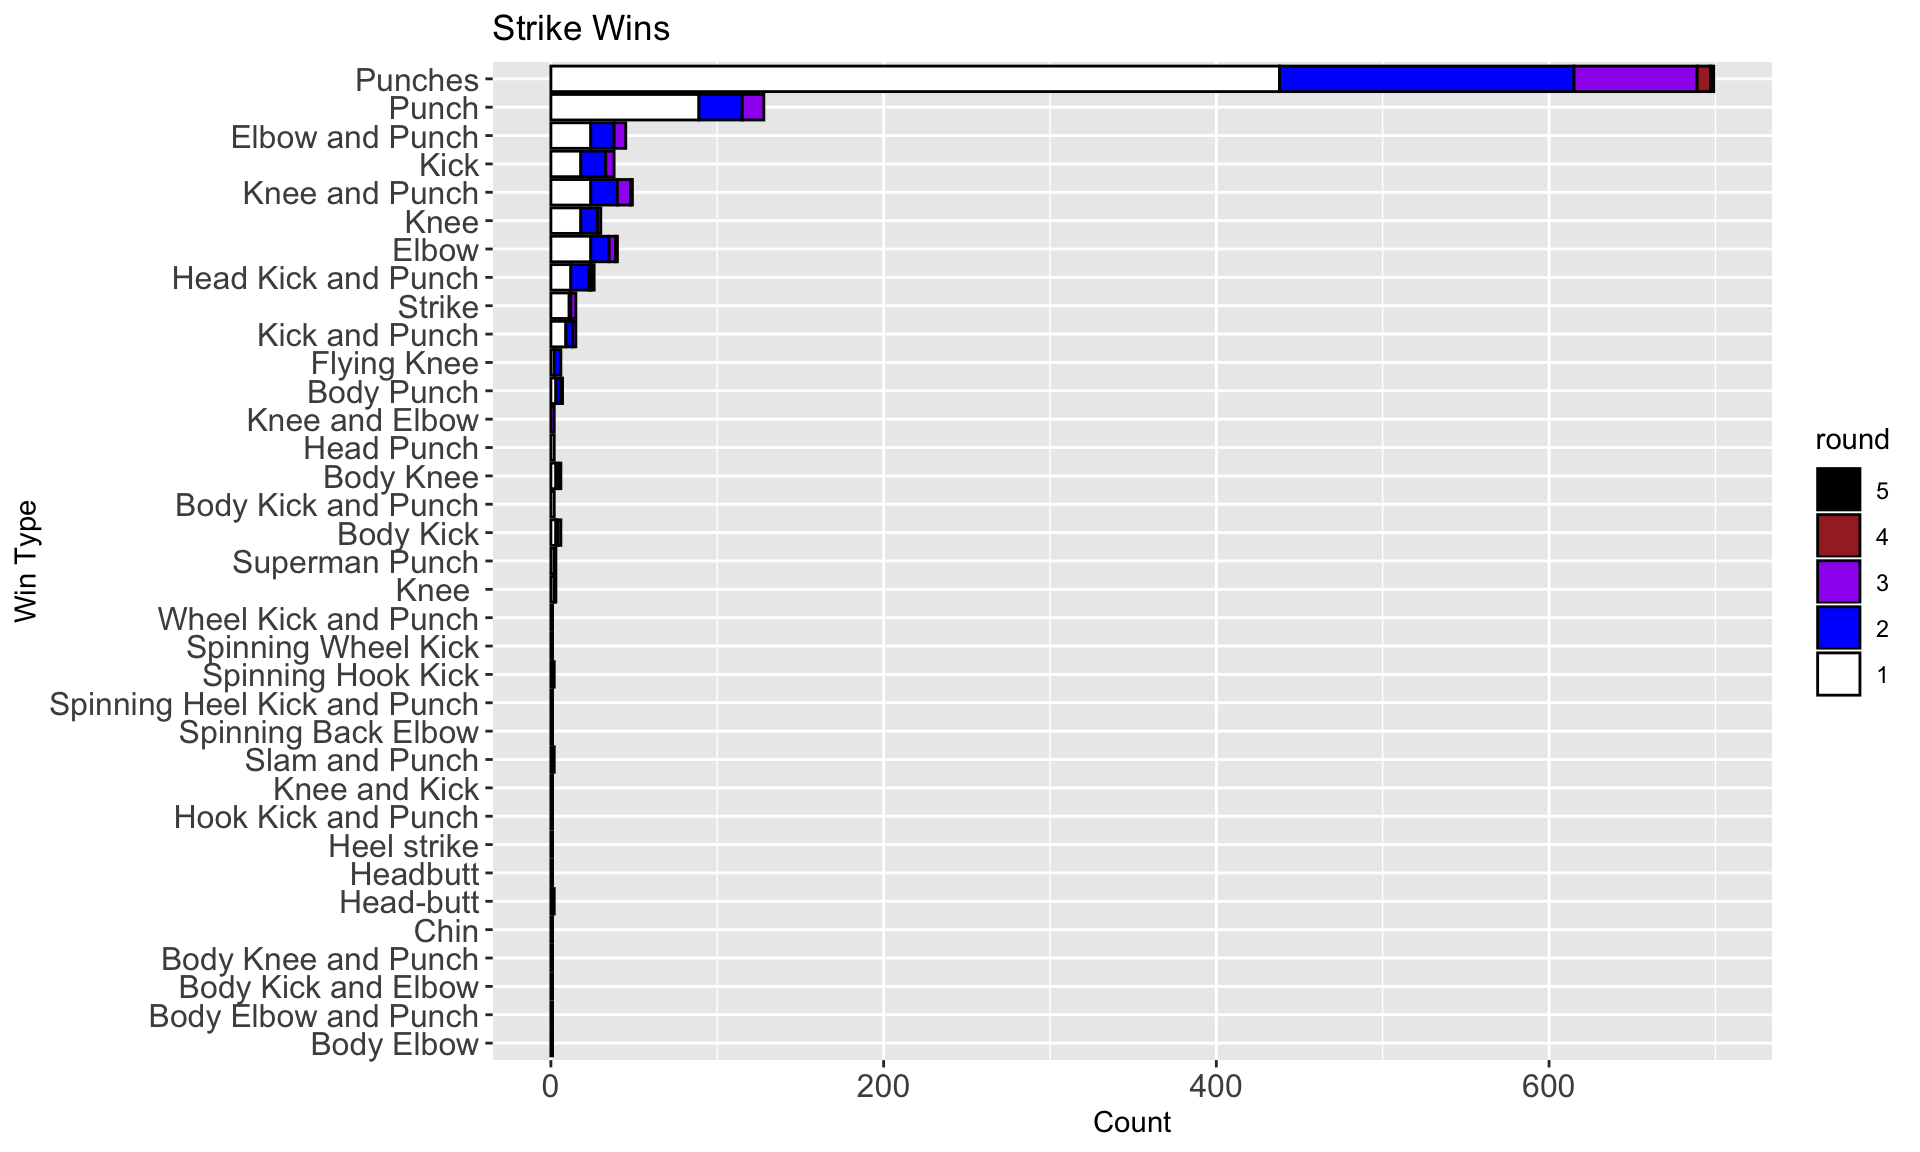
| Sub Category | Round 1 | Round 2 | Round 3 | Round 4 | Round 5 | Total |
|---|---|---|---|---|---|---|
| Punches | 438 | 177 | 74 | 8 | 2 | 699 |
| Punch | 89 | 26 | 13 | 0 | 0 | 128 |
| Knee and Punch | 24 | 16 | 8 | 1 | 0 | 49 |
| Elbow and Punch | 24 | 14 | 7 | 0 | 0 | 45 |
| Elbow | 24 | 11 | 4 | 0 | 1 | 40 |
| Kick | 18 | 15 | 5 | 0 | 0 | 38 |
| Knee | 18 | 10 | 2 | 0 | 0 | 30 |
| Head Kick and Punch | 12 | 11 | 1 | 0 | 2 | 26 |
| Kick and Punch | 9 | 4 | 2 | 0 | 0 | 15 |
| Strike | 11 | 1 | 3 | 0 | 0 | 15 |
| Body Punch | 3 | 3 | 1 | 0 | 0 | 7 |
| Body Kick | 3 | 1 | 2 | 0 | 0 | 6 |
| Body Knee | 3 | 2 | 1 | 0 | 0 | 6 |
| Flying Knee | 2 | 4 | 0 | 0 | 0 | 6 |
| Knee | 2 | 1 | 0 | 0 | 0 | 3 |
| Superman Punch | 2 | 0 | 1 | 0 | 0 | 3 |
| Body Kick and Punch | 2 | 0 | 0 | 0 | 0 | 2 |
| Head Punch | 2 | 0 | 0 | 0 | 0 | 2 |
| Head-butt | 1 | 0 | 1 | 0 | 0 | 2 |
| Knee and Elbow | 0 | 0 | 2 | 0 | 0 | 2 |
| Slam and Punch | 1 | 0 | 0 | 0 | 1 | 2 |
| Spinning Hook Kick | 1 | 0 | 1 | 0 | 0 | 2 |
| Body Elbow | 0 | 0 | 1 | 0 | 0 | 1 |
| Body Elbow and Punch | 1 | 0 | 0 | 0 | 0 | 1 |
| Body Kick and Elbow | 0 | 1 | 0 | 0 | 0 | 1 |
| Body Knee and Punch | 0 | 0 | 1 | 0 | 0 | 1 |
| Chin | 1 | 0 | 0 | 0 | 0 | 1 |
| Headbutt | 1 | 0 | 0 | 0 | 0 | 1 |
| Heel strike | 0 | 0 | 1 | 0 | 0 | 1 |
| Hook Kick and Punch | 0 | 1 | 0 | 0 | 0 | 1 |
| Knee and Kick | 1 | 0 | 0 | 0 | 0 | 1 |
| Spinning Back Elbow | 0 | 0 | 1 | 0 | 0 | 1 |
| Spinning Heel Kick and Punch | 1 | 0 | 0 | 0 | 0 | 1 |
| Spinning Wheel Kick | 0 | 0 | 1 | 0 | 0 | 1 |
| Wheel Kick and Punch | 0 | 1 | 0 | 0 | 0 | 1 |
Wins by Joint Lock
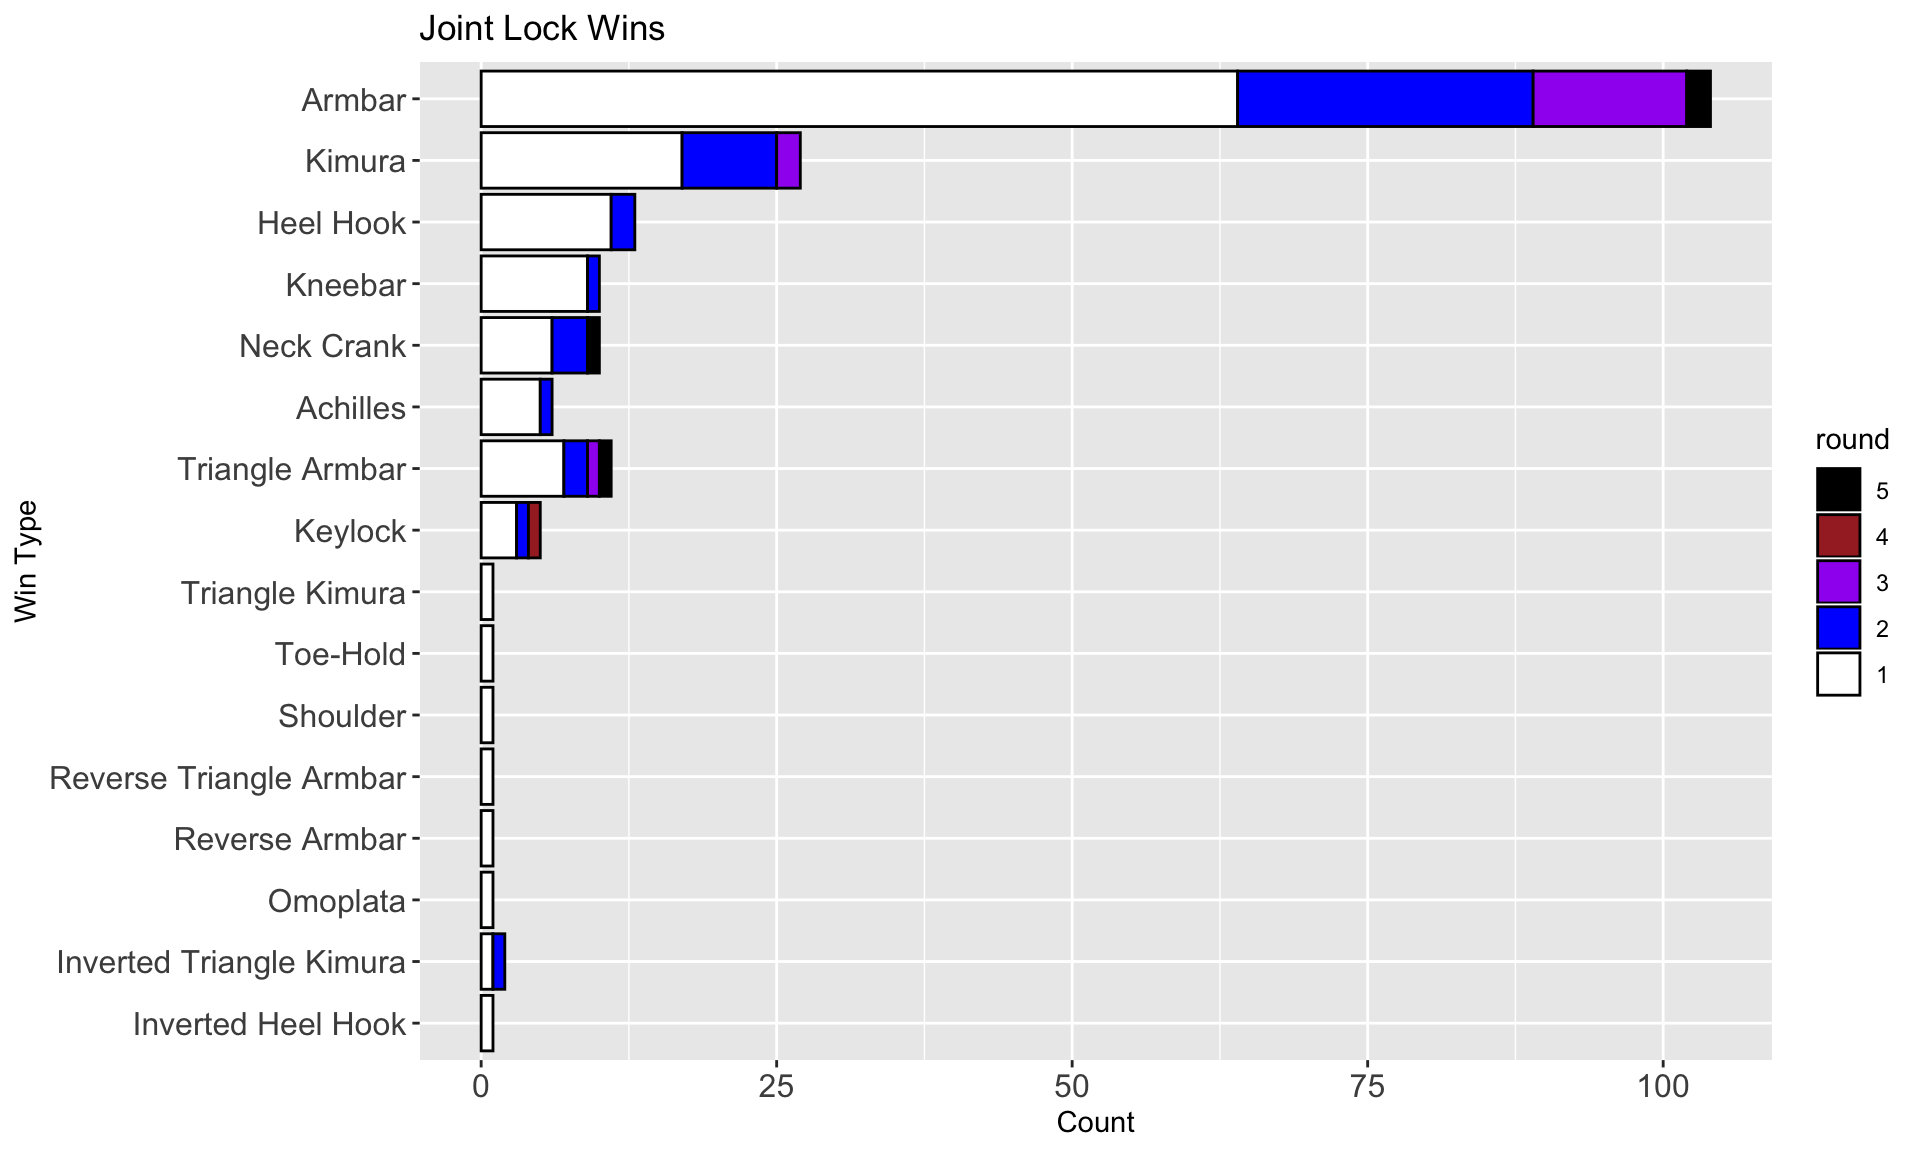
| Sub Category | Round 1 | Round 2 | Round 3 | Round 4 | Round 5 | Total |
|---|---|---|---|---|---|---|
| Armbar | 64 | 25 | 13 | 0 | 2 | 104 |
| Kimura | 17 | 8 | 2 | 0 | 0 | 27 |
| Heel Hook | 11 | 2 | 0 | 0 | 0 | 13 |
| Triangle Armbar | 7 | 2 | 1 | 0 | 1 | 11 |
| Kneebar | 9 | 1 | 0 | 0 | 0 | 10 |
| Neck Crank | 6 | 3 | 0 | 0 | 1 | 10 |
| Achilles | 5 | 1 | 0 | 0 | 0 | 6 |
| Keylock | 3 | 1 | 0 | 1 | 0 | 5 |
| Inverted Triangle Kimura | 1 | 1 | 0 | 0 | 0 | 2 |
| Inverted Heel Hook | 1 | 0 | 0 | 0 | 0 | 1 |
| Omoplata | 1 | 0 | 0 | 0 | 0 | 1 |
| Reverse Armbar | 1 | 0 | 0 | 0 | 0 | 1 |
| Reverse Triangle Armbar | 1 | 0 | 0 | 0 | 0 | 1 |
| Shoulder | 1 | 0 | 0 | 0 | 0 | 1 |
| Toe-Hold | 1 | 0 | 0 | 0 | 0 | 1 |
| Triangle Kimura | 1 | 0 | 0 | 0 | 0 | 1 |
Wins by Choke
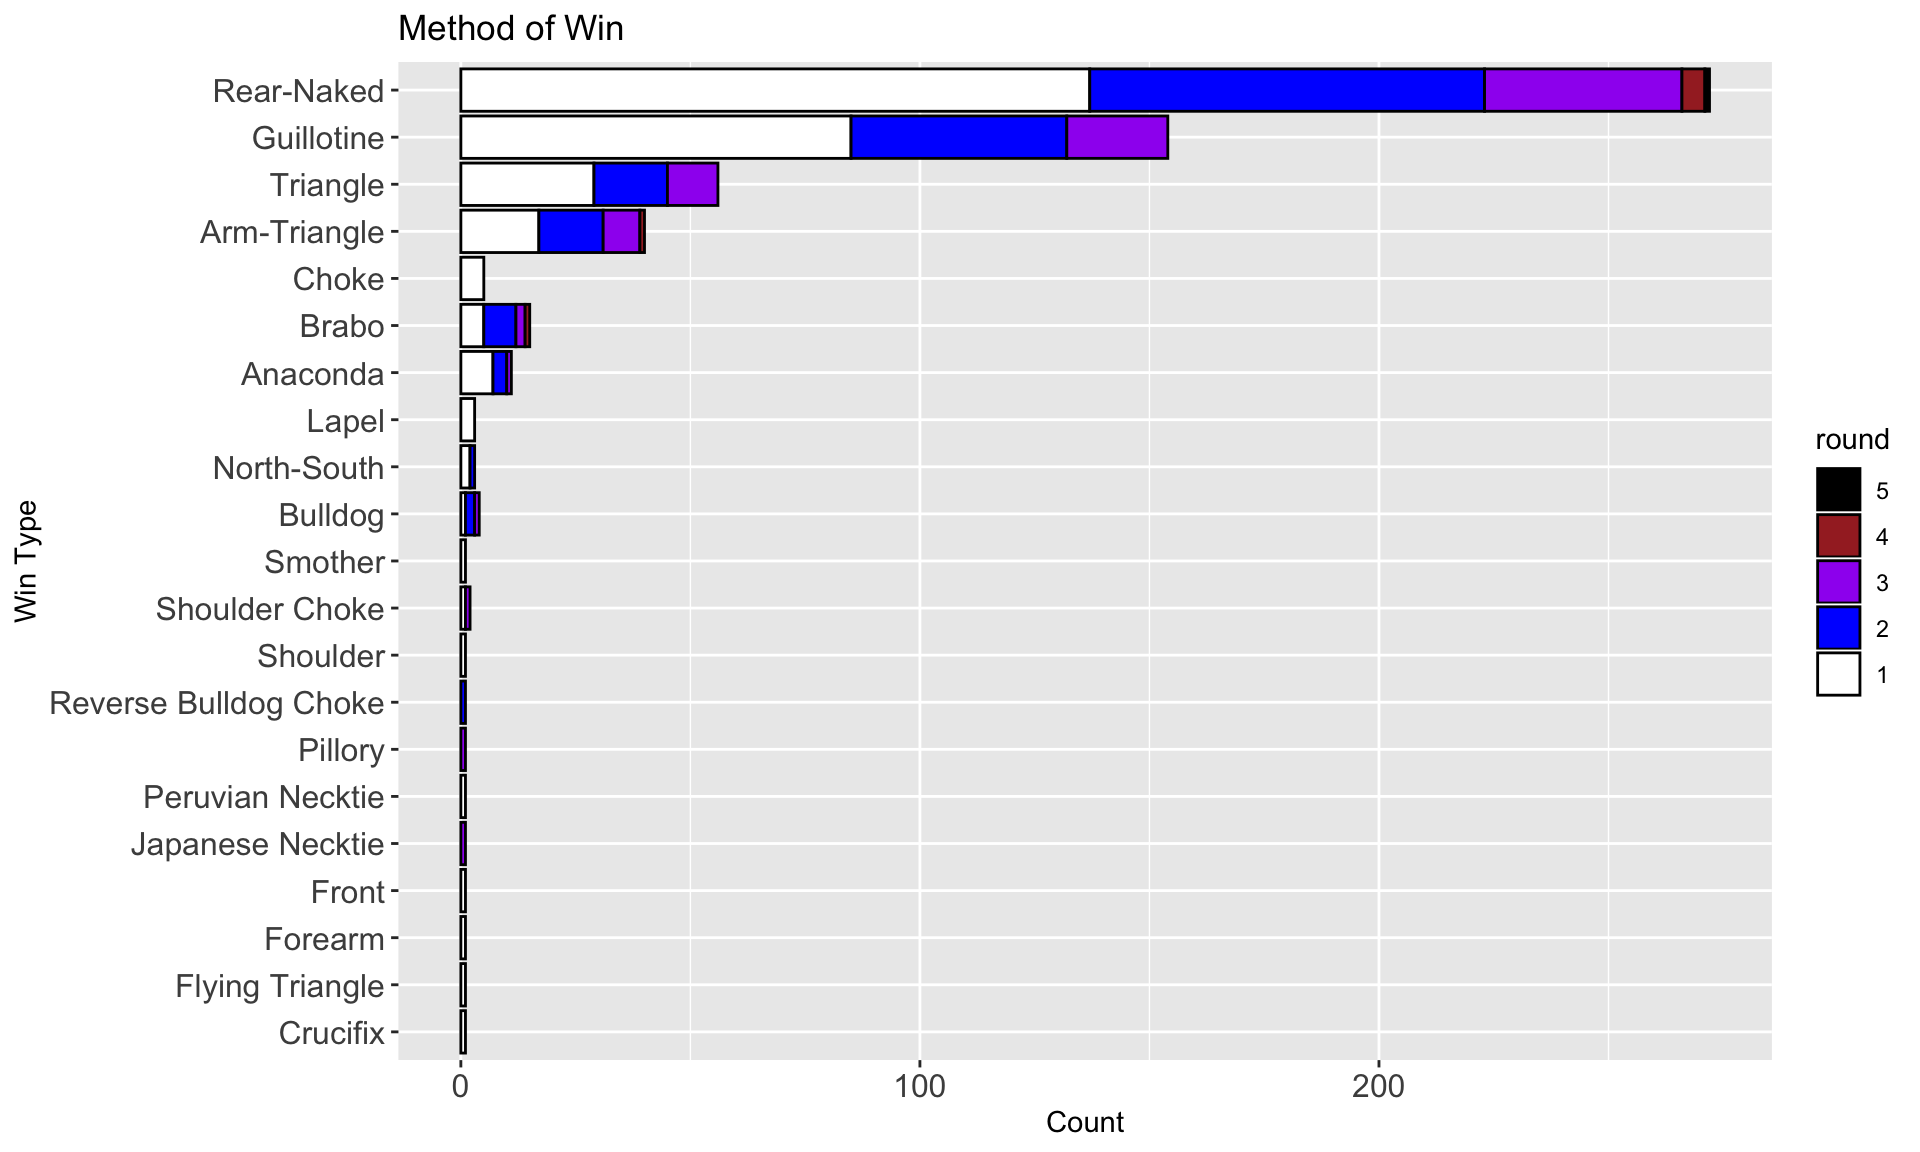
| Sub Category | Round 1 | Round 2 | Round 3 | Round 4 | Round 5 | Total |
|---|---|---|---|---|---|---|
| Rear-Naked | 137 | 86 | 43 | 5 | 1 | 272 |
| Guillotine | 85 | 47 | 22 | 0 | 0 | 154 |
| Triangle | 29 | 16 | 11 | 0 | 0 | 56 |
| Arm-Triangle | 17 | 14 | 8 | 1 | 0 | 40 |
| Brabo | 5 | 7 | 2 | 1 | 0 | 15 |
| Anaconda | 7 | 3 | 1 | 0 | 0 | 11 |
| Choke | 5 | 0 | 0 | 0 | 0 | 5 |
| Bulldog | 1 | 2 | 1 | 0 | 0 | 4 |
| Lapel | 3 | 0 | 0 | 0 | 0 | 3 |
| North-South | 2 | 1 | 0 | 0 | 0 | 3 |
| Shoulder Choke | 1 | 0 | 1 | 0 | 0 | 2 |
| Crucifix | 1 | 0 | 0 | 0 | 0 | 1 |
| Flying Triangle | 1 | 0 | 0 | 0 | 0 | 1 |
| Forearm | 1 | 0 | 0 | 0 | 0 | 1 |
| Front | 1 | 0 | 0 | 0 | 0 | 1 |
| Japanese Necktie | 0 | 0 | 1 | 0 | 0 | 1 |
| Peruvian Necktie | 1 | 0 | 0 | 0 | 0 | 1 |
| Pillory | 0 | 0 | 1 | 0 | 0 | 1 |
| Reverse Bulldog Choke | 0 | 1 | 0 | 0 | 0 | 1 |
| Shoulder | 1 | 0 | 0 | 0 | 0 | 1 |
| Smother | 1 | 0 | 0 | 0 | 0 | 1 |
Wins by Decision
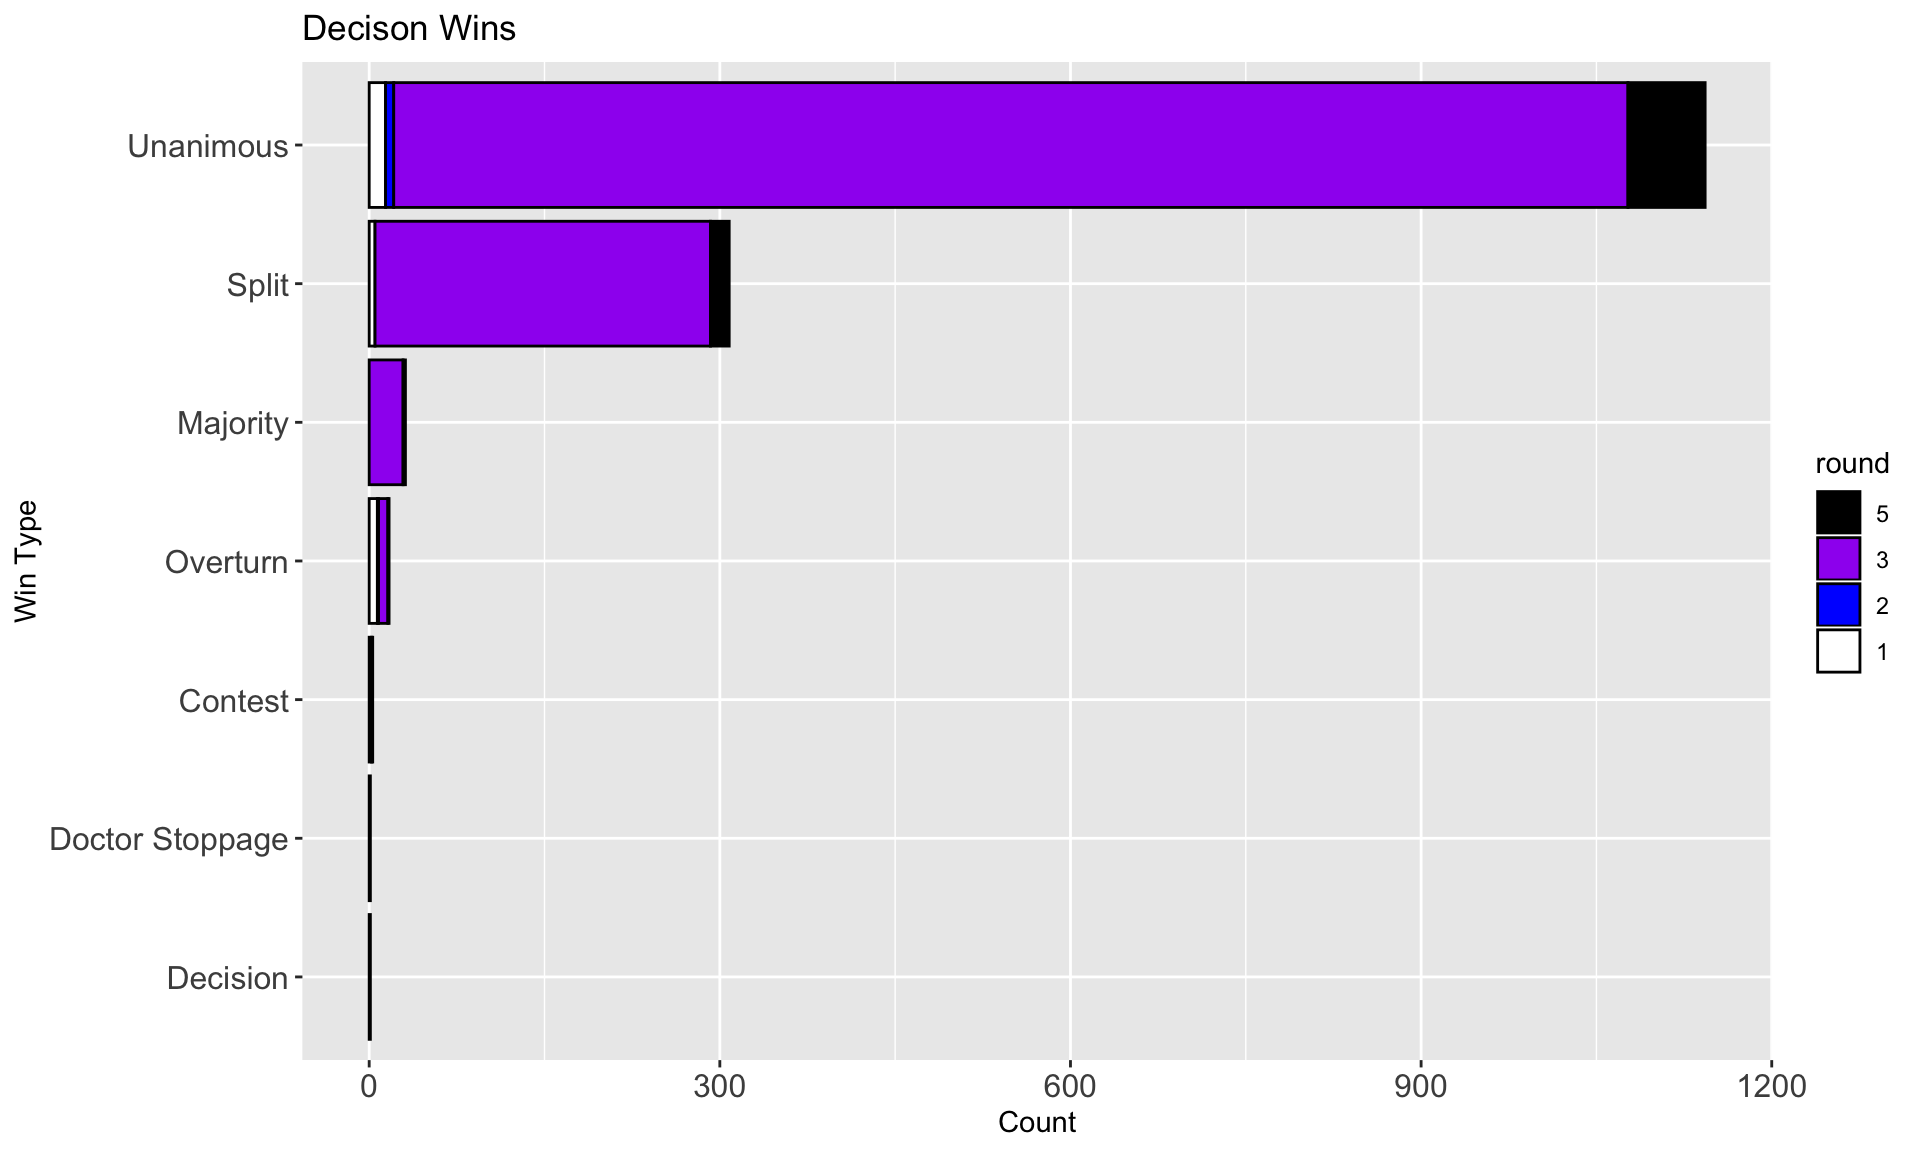
| Sub Category | Round 1 | Round 2 | Round 3 | Round 5 | Total |
|---|---|---|---|---|---|
| Unanimous | 14 | 7 | 1056 | 66 | 1143 |
| Split | 5 | 0 | 287 | 16 | 308 |
| Majority | 0 | 0 | 29 | 2 | 31 |
| Overturn | 7 | 1 | 8 | 1 | 17 |
| Contest | 0 | 2 | 1 | 0 | 3 |
| Decision | 0 | 0 | 1 | 0 | 1 |
| Doctor Stoppage | 1 | 0 | 0 | 0 | 1 |
Wins by Injury
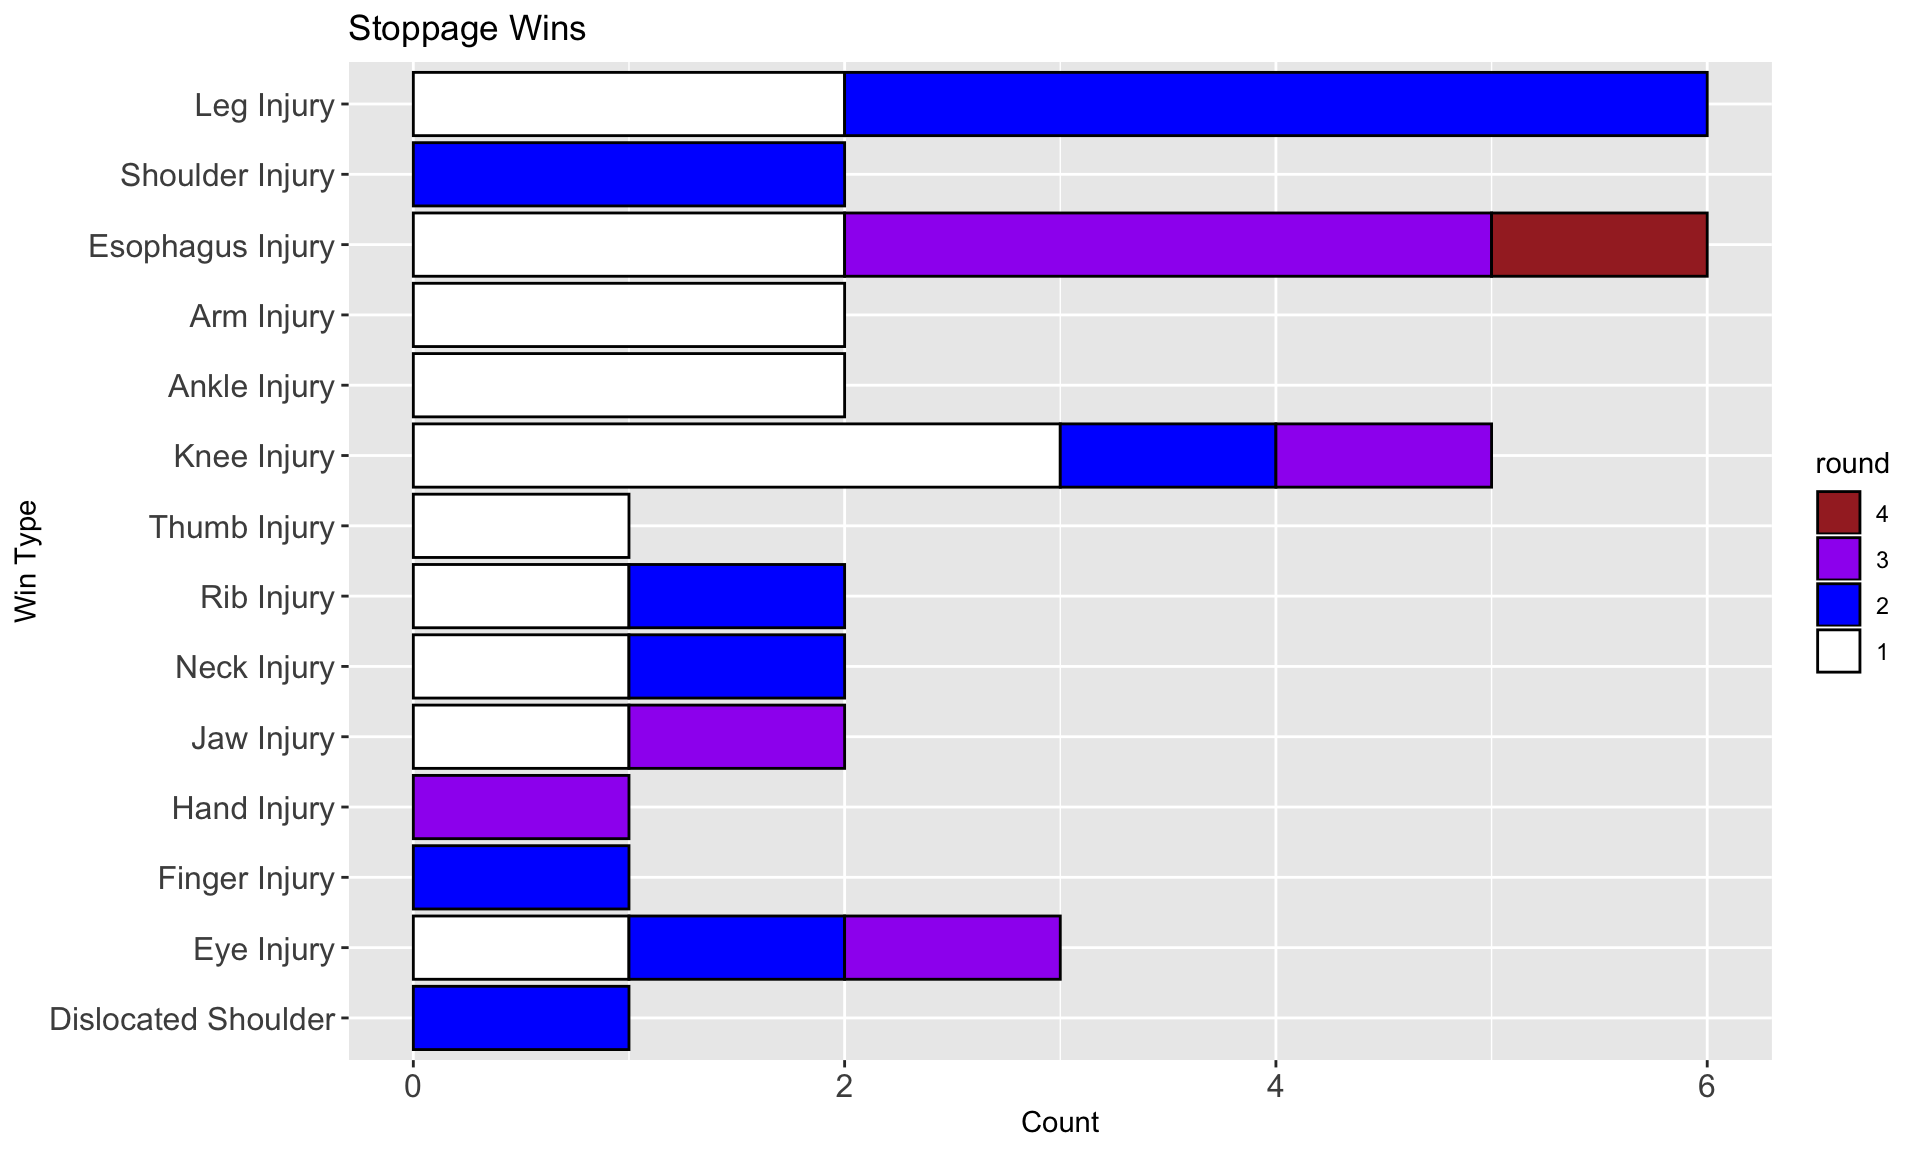
| Sub Category | Round 1 | Round 2 | Round 3 | 4 | Total |
|---|---|---|---|---|---|
| Leg Injury | 2 | 4 | 0 | 0 | 6 |
| Esophagus Injury | 2 | 0 | 3 | 1 | 5 |
| Knee Injury | 3 | 1 | 1 | 0 | 5 |
| Eye Injury | 1 | 1 | 1 | 0 | 3 |
| Ankle Injury | 2 | 0 | 0 | 0 | 2 |
| Arm Injury | 2 | 0 | 0 | 0 | 2 |
| Jaw Injury | 1 | 0 | 1 | 0 | 2 |
| Neck Injury | 1 | 1 | 0 | 0 | 2 |
| Rib Injury | 1 | 1 | 0 | 0 | 2 |
| Shoulder Injury | 0 | 2 | 0 | 0 | 2 |
| Dislocated Shoulder | 0 | 1 | 0 | 0 | 1 |
| Finger Injury | 0 | 1 | 0 | 0 | 1 |
| Hand Injury | 0 | 0 | 1 | 0 | 1 |
| Thumb Injury | 1 | 0 | 0 | 0 | 1 |
Wins by Stoppage
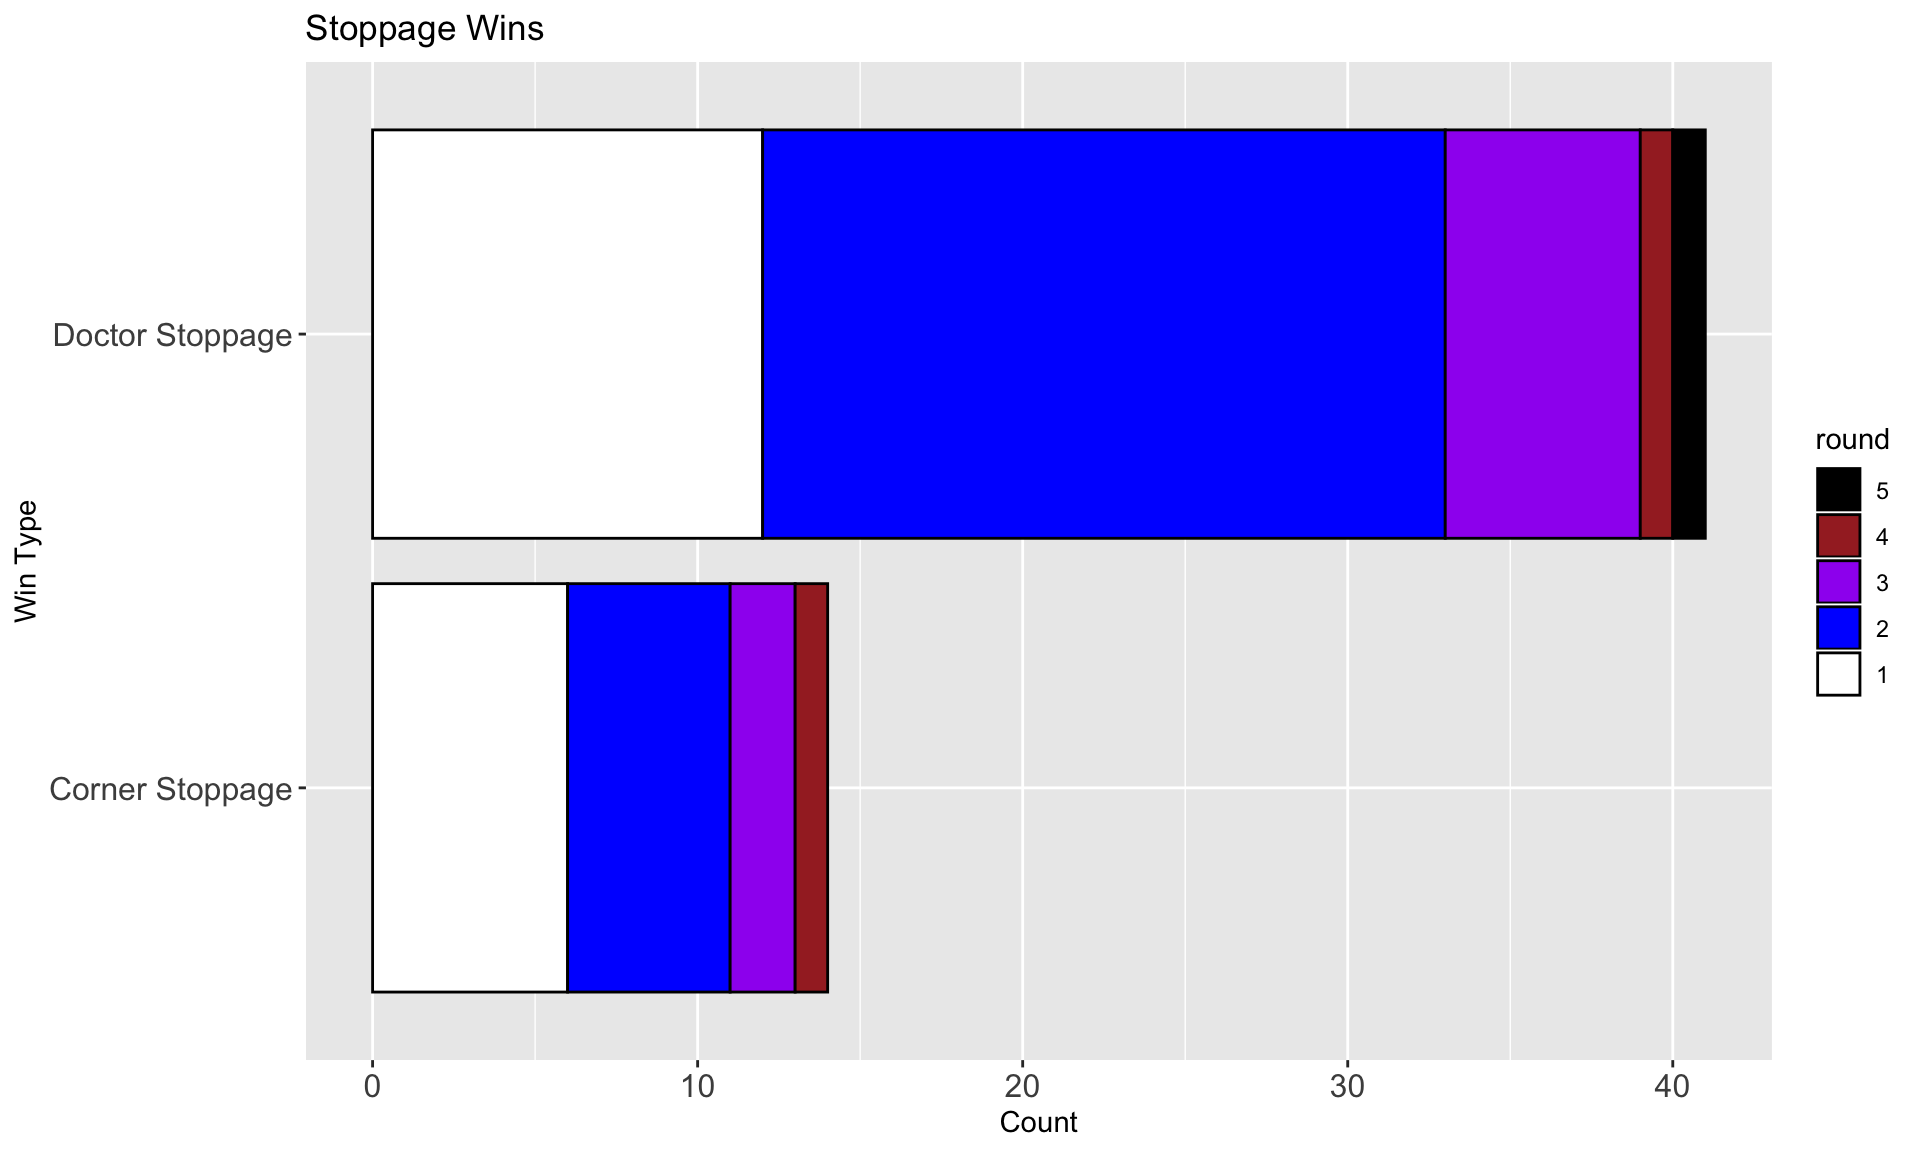
| Sub Category | Round 1 | Round 2 | Round 3 | Round 4 | Round 5 | Total |
|---|---|---|---|---|---|---|
| Doctor Stoppage | 12 | 21 | 6 | 1 | 1 | 41 |
| Corner Stoppage | 6 | 5 | 2 | 1 | 0 | 14 |
Wins for other reasons
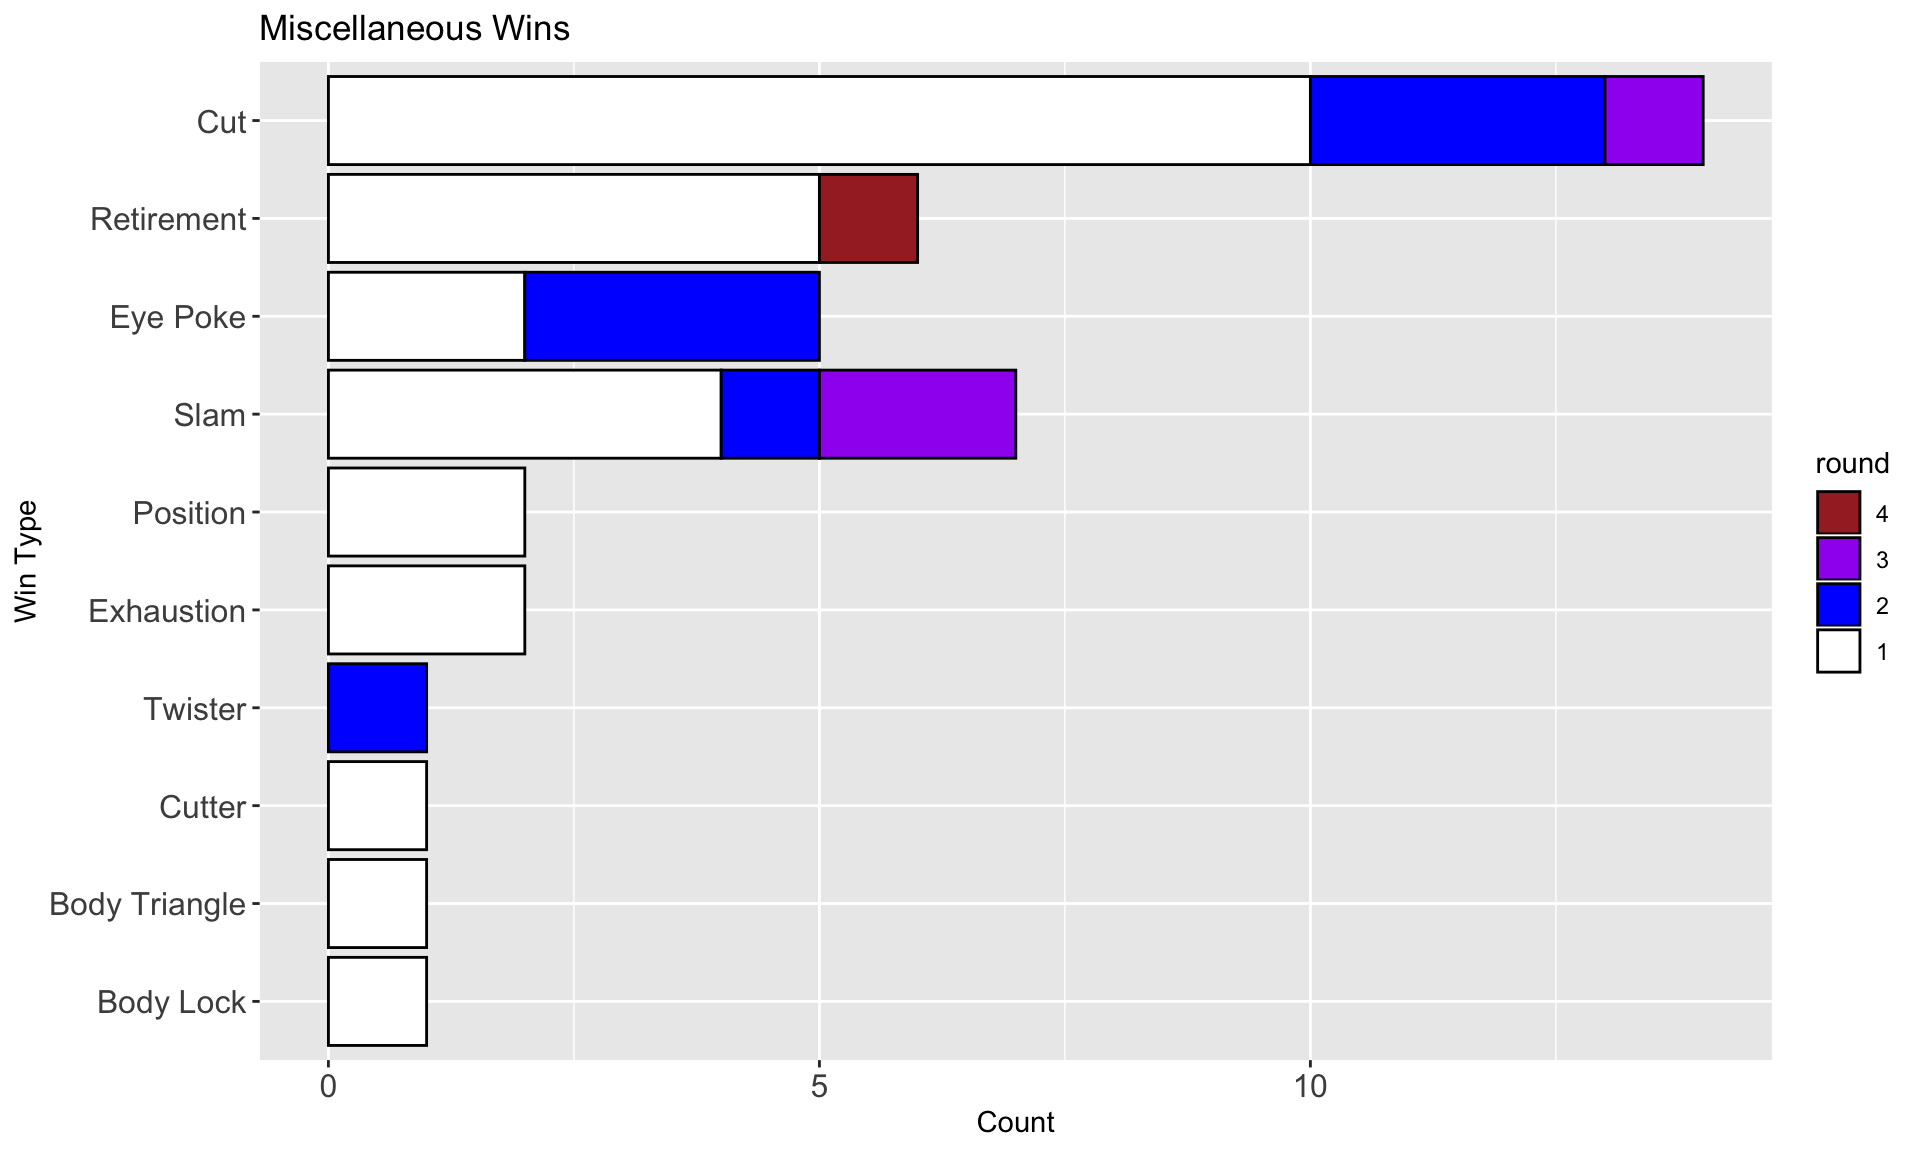
| Sub Category | Round 1 | Round 2 | Round 3 | Round 4 | Total |
|---|---|---|---|---|---|
| Cut | 10 | 3 | 1 | 0 | 14 |
| Slam | 4 | 1 | 2 | 0 | 7 |
| Retirement | 5 | 0 | 0 | 1 | 6 |
| Eye Poke | 2 | 3 | 0 | 0 | 5 |
| Exhaustion | 2 | 0 | 0 | 0 | 2 |
| Position | 2 | 0 | 0 | 0 | 2 |
| Body Lock | 1 | 0 | 0 | 0 | 1 |
| Body Triangle | 1 | 0 | 0 | 0 | 1 |
| Cutter | 1 | 0 | 0 | 0 | 1 |
| Twister | 0 | 1 | 0 | 0 | 1 |